AyushP_BallDetectingRobot
This project highlights my progress working on a Raspberry Pi Machine Learning model which will detect a ball and a robot will move towards it.
Project maintained by ayushpillai28 Hosted on GitHub Pages — Theme by mattgraham
Autonmous Robot with Raspberry Pi
I am working on a Raspberry Pi Machine Learning model with the eventual goal of creating a fully autonmous car.
| Ayush P | Groton School | Engineer | Incoming Junior |
Presentation
Final Milestone
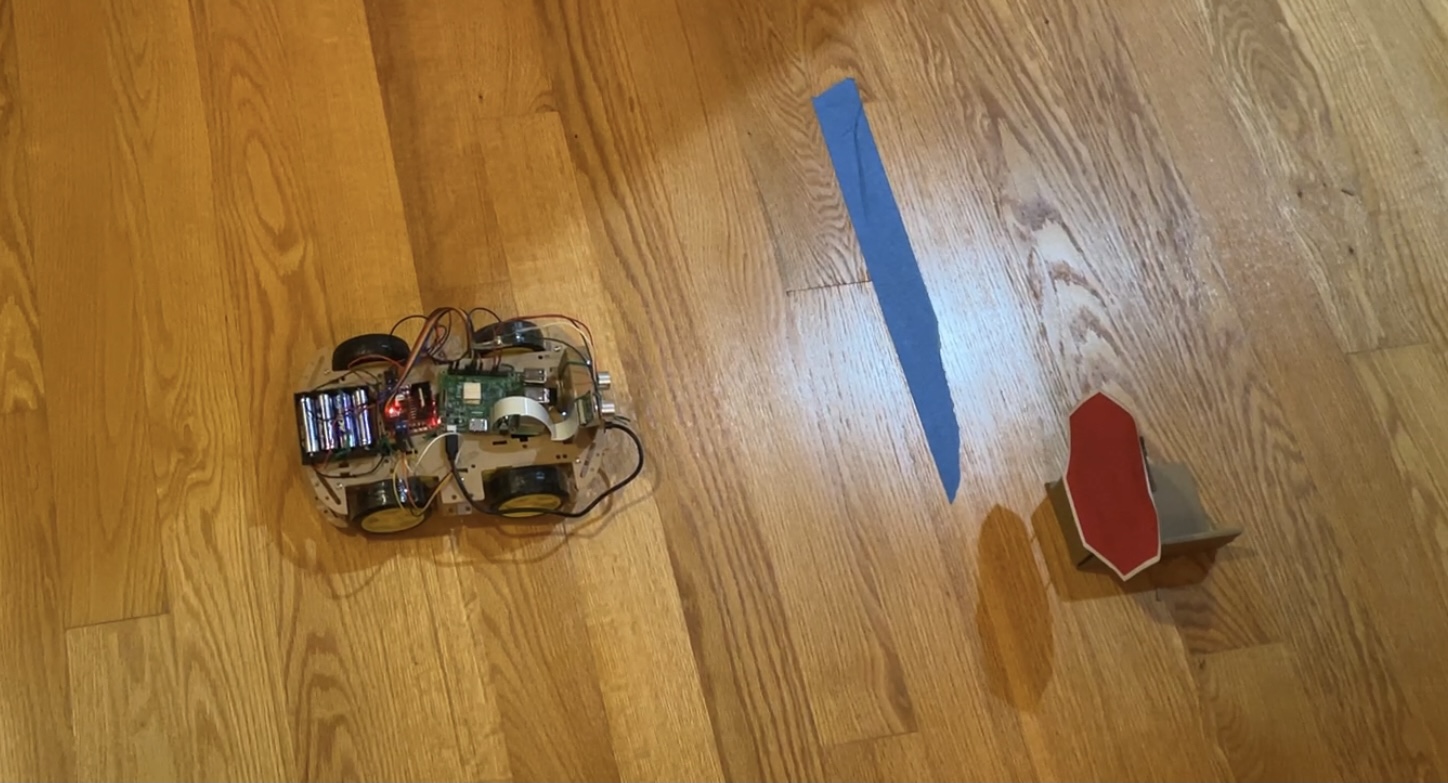
For my final milestone I wanted to incorporate an ultrasonic sensor to my car as well as modify the stop sign code to make my robot more autonomous. I added an ultrasonic sensor to my robot and created a program that the robot would stop if there was anything less that 10 cm away from the robot. Once the object was removed the robot would continue to move. My stop sign code modifications included making the robot stop for two seconds once it recognizes a stop sign. I also modified the area of red necessary for the robot to classify the object as a stop sign, allowing me to move the rpbpt to the left of the sign so I don’t have to pick up the sign. When I combined the modified stop sign code and ultrasonic code, it created a program that the robot would move forward until it sees the stop sign, it would then stop for two seconds, and then continue to move forward. However if the robot sees any object less than 10 cm away at any point, most commonly at the stop sign, it will stop until the object is out of the sight of the ultrasonic sencor.
Second Milestone
My second milestone involved using the ultrasonic sensors and the camera module to detect other objects that may be in the path of the robot. After connecting the ultrasonic sensor to the rasperry pi, I created a program that would measure the distance the robot is from an object. Since the robot will have ultrasonic sensors on the sides and the front, this gives it the ability to recognize other vehicles or pedestrians that may crash into it and act accordingly. The camera module is used to detect objects as well but it differs from the ultrasonic sensor because it can also recognize what object it is detecting. By using OpenCV, I created a program that would allow the camera module to detect red and green as well as the shape of the object. For example, if there was a red stop sign ahead, the robot would recognize the hexagon shape and the color red and the robot would stop. This program can be expanded to other colors and shaped to recognize speed limits, traffic light colors, and other signs that are necessary to regulate traffic.
First Milestone
My first milestone was programming my motors to move change direction. Once I set up the Rasperry Pi, I connected the motor driver and the motors to the raspberry pi. I then used those pins to create my code. To make sure all the wires connecting the motors to the motor driver were well connected, I used a saughtering iron to connect the wires to the The first step to my code was to get the motors to move forwards and backwards and stop. Once I completed that task, I moved onto turning left and right. After my code was complete and the motors were functional, I assembled the chassis so I could see the robot in action instead of just the motors.
Reflection
This project was a real test of perseverance and hard work. A lesson that became apparent fairly early on was that nothing is going to work on the first try. I wrote ten or 15 programs for this project, some much smaller than the others, and every program had a lot of problems that I didn’t originally know the answer to. The important thing is to expect the issues with the programs and accept it as being normal. Luckily we had instructors to help us out but even when I was working on my own I had to watch aso many youtube videos and look at hundreds of websites to solve the problems. The hardest part has to be some of the programming challenges I faced in the last week. There was a problem with the time.sleep() command which was essential to my program and it took me, my instructor, and even the rest of my family, many hours to figure it out. Even though the programming was the hardest part, it was definetly my favorite due to the problem solving it offered. Building the robot is cool but it has no function until you start programming it. And when it comes to an autonomous car, programming is everything.
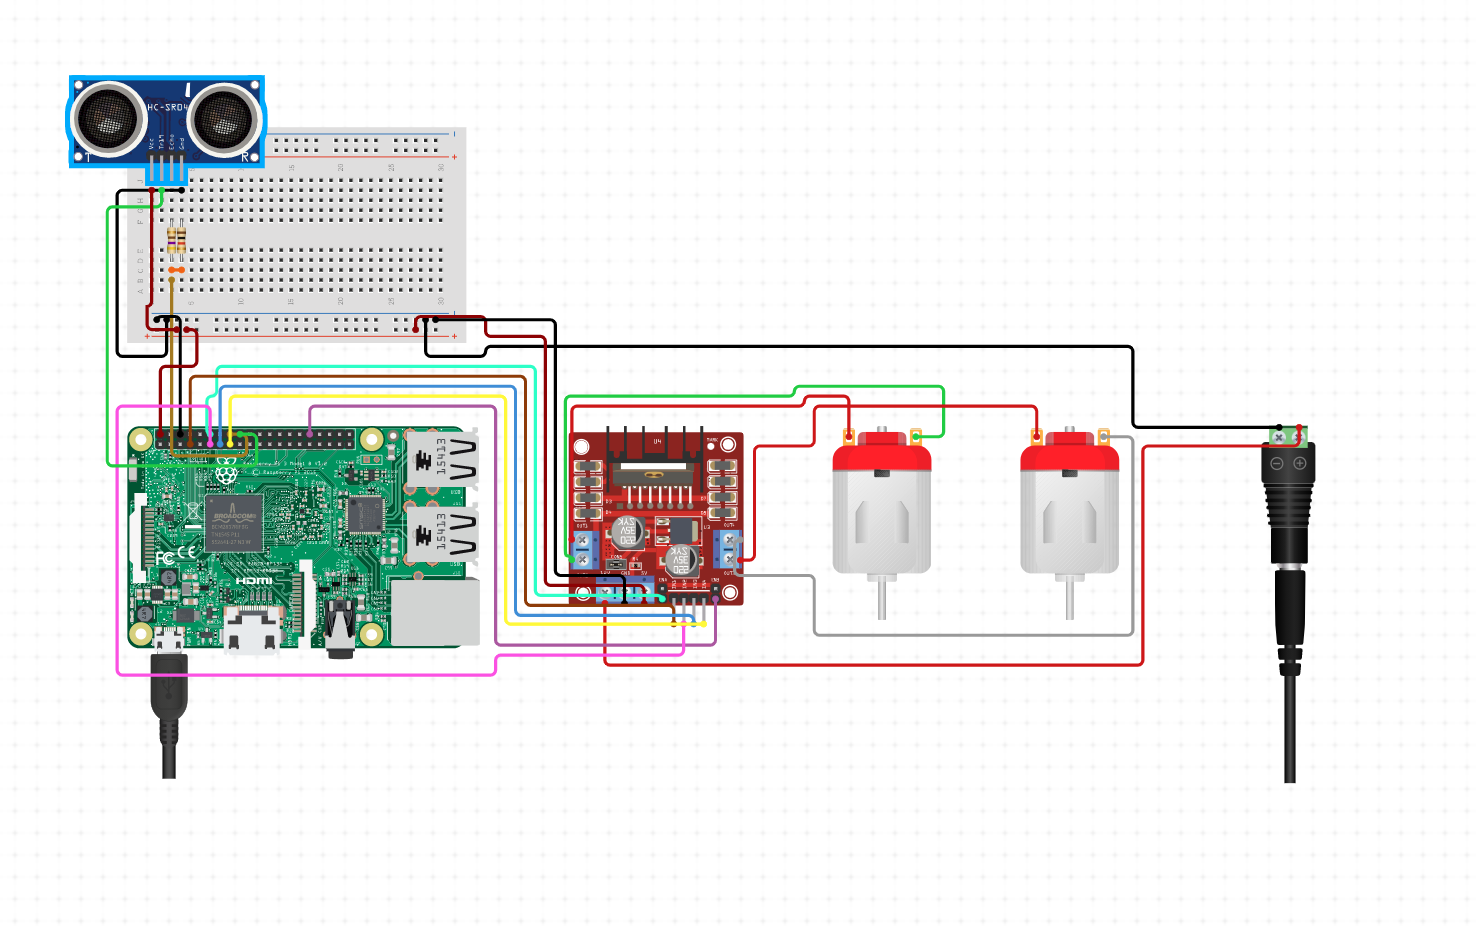
Diagram of Raspberry Pi Attachments
Python Code for the Stop Sign and Ultrasonic Program
import cv2
import numpy as np
import time
from time import sleep
import RPi.GPIO as GPIO

GPIO.setmode(GPIO.BCM)

def nothing(x):
    pass

cap = cv2.VideoCapture(0)

sign=0


TRIG = 5
ECHO = 6


font = cv2.FONT_HERSHEY_COMPLEX

print("hello") #check


class Motor():
    def __init__(self,Ena,In1,In2,Enb,In3,In4):
        self.Ena = Ena
        self.In1 = In1
        self.In2 = In2
        self.Enb = Enb
        self.In3 = In3
        self.In4 = In4
        GPIO.setup(self.Ena,GPIO.OUT)
        GPIO.setup(self.In1,GPIO.OUT)
        GPIO.setup(self.In2,GPIO.OUT)
        GPIO.setup(self.Enb,GPIO.OUT)
        GPIO.setup(self.In3,GPIO.OUT)
        GPIO.setup(self.In4,GPIO.OUT)
        self.pwm1 = GPIO.PWM(self.Ena,100)
        self.pwm2 = GPIO.PWM(self.Enb,100)
        self.pwm1.start(0)
        self.pwm2.start(0)

    def moveF(self,x=70, t=0):
        GPIO.output(self.In1,GPIO.LOW)
        GPIO.output(self.In2,GPIO.HIGH)
        GPIO.output(self.In3,GPIO.LOW)
        GPIO.output(self.In4,GPIO.HIGH)
        self.pwm1.ChangeDutyCycle(x
        self.pwm2.ChangeDutyCycle(x)


    def moveB(self,x=70,t=0):
        GPIO.output(self.In1,GPIO.HIGH)
        GPIO.output(self.In2,GPIO.LOW)
        GPIO.output(self.In3,GPIO.HIGH)
        GPIO.output(self.In4,GPIO.LOW)
        self.pwm1.ChangeDutyCycle(x)
        self.pwm2.ChangeDutyCycle(x)


    def moveL(self,x=70):
        GPIO.output(self.In1,GPIO.HIGH)
        GPIO.output(self.In2,GPIO.LOW)
        GPIO.output(self.In3,GPIO.LOW)
        GPIO.output(self.In4,GPIO.HIGH)
        self.pwm1.ChangeDutyCycle(x)
        self.pwm2.ChangeDutyCycle(x)


    def moveR(self,x=70):
        GPIO.output(self.In1,GPIO.LOW)
        GPIO.output(self.In2,GPIO.HIGH)
        GPIO.output(self.In3,GPIO.HIGH)
        GPIO.output(self.In4,GPIO.LOW)
        self.pwm1.ChangeDutyCycle(x)
        self.pwm2.ChangeDutyCycle(x)


    def stop(self,t=0):
        self.pwm1.ChangeDutyCycle(0)
        self.pwm2.ChangeDutyCycle(0)
        GPIO.output(self.In1,GPIO.LOW)
        GPIO.output(self.In2,GPIO.LOW)
        GPIO.output(self.In3,GPIO.LOW)
        GPIO.output(self.In4,GPIO.LOW)
        sleep(t)

motor1 = Motor(22,27,17,23,24,25)

print("while")

while True:
    GPIO.setup (TRIG, GPIO.OUT)
    GPIO.setup (ECHO, GPIO.IN)
    GPIO.output(TRIG, False)
    sleep(0.2)
    GPIO.output(TRIG, True)
    #sleep(0.0001)
    GPIO.output(TRIG, False)
    while GPIO.input(ECHO) == 0:
        start = time.time()
    while GPIO.input(ECHO) == 1:
        end = time.time()
    duration = end-start
    distance = duration * 17150
    distance = round(distance,2)
    print("distance", distance)
    while distance<20:
        motor1.stop()
        GPIO.setup (TRIG, GPIO.OUT)
        GPIO.setup (ECHO, GPIO.IN)
        GPIO.output(TRIG, False)
        sleep(0.2)
        GPIO.output(TRIG, True)
    #    sleep(0.0001)
        GPIO.output(TRIG, False)
        while GPIO.input(ECHO) == 0:
            start = time.time()
        while GPIO.input(ECHO) == 1:
            end = time.time()
        duration = end-start
        distance = duration * 17150
        distance = round(distance,2)
        print("distance2", distance)


    _,frame = cap.read()
    hsv= cv2.cvtColor(frame, cv2.COLOR_BGR2HSV)


    lower_red = np.array ([125,154,144])
    upper_red = np.array([180,255,243])

    mask = cv2.inRange(hsv, lower_red, upper_red)
    kernel = np.ones((5,5), np.uint8)
    mask=cv2.erode(mask,kernel)

    print("move")
    motor1.moveF(70)

    _,contours,_ = cv2.findContours(mask, cv2.RETR_TREE, cv2.CHAIN_APPROX_SIMPLE)

    for cnt in contours:
        area = cv2.contourArea(cnt)
        print("area", area)

        approx= cv2.approxPolyDP(cnt, 0.02*cv2.arcLength(cnt,True), True)
        x = approx.ravel()[0]
        y = approx.ravel()[1]


        if area> 10000:

            cv2.drawContours(frame, [approx], 0, (0,0,0))

            print("len approx ", len(approx))

            if 6<len(approx)<9:
                if sign == 0:
                    cv2.putText (frame,"STOP sign", (x,y),font,1, (0,0,0))
                    print("stop")
                    motor1.stop(2)
                sign += 1
                print ("sign", sign)
                if sign == 20:
                    sign = 0


    cv2.imshow("Frame", frame)
    cv2.imshow ("Mask", mask)
    cv2.imshow ("kernel", kernel)


    k = cv2.waitKey(1)

    if k == 27:
        print("break")
        break


cap.release()
cv2.destroyAllWindows()